
Most Labrador crate and bed setup advice skips the part that actually costs money. Everyone wants to argue about the bed. Almost nobody talks about what goes under it, and that is where the damage happens: a puppy who is not house trained yet, a crate pan that overflows at 2 a.m., and a hardwood floor that never quite comes back.
I trained dogs for ten years, most of it with hunting labs and obedience clients, and I spent enough time in kennels to learn that gear fails in the same order every time. Fabric first. Then zippers. Then foam. The frame is almost never the problem.
I live in Ohio now with two labs. Duke is a 75 pound black lab, five years old, and he chews everything he can reach. Penny is a 55 pound rescue, eleven years old, with hip dysplasia you can see in her walk every morning. This is how I set up the crate and sleeping area for both of them: floor protection first, then foam that actually holds up a big dog.
Why you should trust me
Ten years as a trainer, first with field labs and then with obedience clients, taught me to read the dog before I read the label. A chewing puppy is not being spiteful. He is doing the one thing puppies do, and your job is to make the bed boring and the chew toy interesting.
That background is also why I keep a notebook. Foam sink depth, wash cycles before a zipper fails, how many weeks a cover lasted against Duke, which beds turned into pancakes by month four. I have had more than 40 dog beds through this house, and I have cut several of them open to look at the foam because the label and the reality were two different things.
Two boundaries. I am not a vet, so I will tell you what my vet said about Penny's hips and I will not play one. And if a brand sends me something, I say so. No exceptions.
How I picked what goes in this guide
I judge gear by three questions, and they have not changed since my kennel days.
Can a determined 75 pound lab destroy it? If the answer is yes, it fails, no matter how nice it looks in the photos. Does it protect or support the thing underneath it? A bed that feels great and does nothing for the floor, or the joints, is furniture. And can it survive the washing machine? Zippers die first. I have tested that part by accident more times than I wanted to.
One honest note about this article. Where I have not lived with an item under both dogs for at least a month, I tell you that and I stick to what the product actually is and what the listing claims. No invented test numbers, no borrowed reviews, no "I ran this for a year" stories I cannot back up.
I also do not trust the word "large." In this industry a large bed is sometimes a 40 pound dog bed with a bigger price tag. Measure your lab nose to tail, add 12 inches, and shop that number instead of the word.
Start with the floor, not the bed
Crate training a lab puppy is a floor protection project that happens to include a dog. A puppy in a crate overnight will have accidents. A crate pan catches some of it. The rest runs out the door of the crate, under the pan, and into whatever is underneath.
The fix is a thin waterproof layer that sits under the crate and extends a few inches past the footprint. Thin matters. A thick pad inside the crate is a chew toy with a job, and a lab puppy will pull it out, drag it around, and shred it by Thursday.
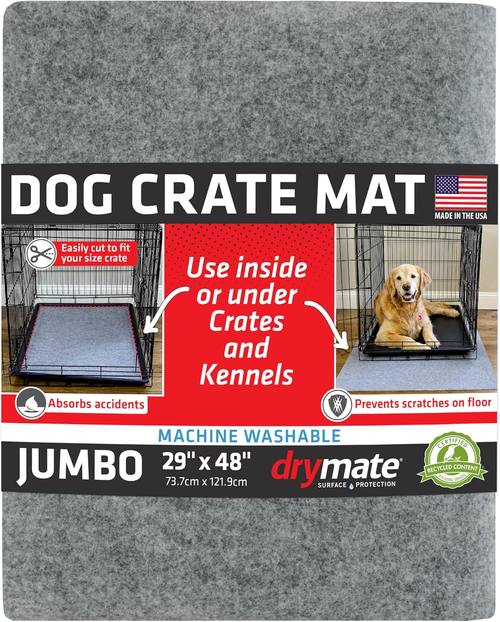
Crate base pick: Drymate Dog Crate Mat Liner, Absorbs Urine, Waterproof, Non-Slip, Washable Puppy Pee Pad for Kennel Training - Use Under Pet Cage to Protect Floors, Thin Cut to Fit Design (USA Made) (LGrey)(29"x48")
 Visit on Amazon →
This is the layer I mean. It is a thin mat sold as a crate liner and a puppy pad, sized 29 by 48 inches in the light grey colorway, made in the USA, and designed to be cut to fit. Three things make it the right tool for this job.
It is thin, so there is nothing for a chewer to grab and drag. It absorbs urine instead of letting it pool and run. And the backing is non-slip, which matters more than people think, because a liner that slides around while a 75 pound lab steps in and out of a crate ends up bunched in a corner doing nothing. Check current Amazon price.
Flaws but not dealbreakers: It is a liner, not a bed. If your lab sleeps on this alone over a hard floor, you have a dog on a hard floor. It is also meant to be trimmed, so measure your crate footprint twice before you cut. Cut edges are cut edges.
This is for the kennel training phase, for a crate, under a cage, or anywhere a floor needs defending. It is not the answer for Penny's hips. That is a different product in the next section.
The bed decision: foam density beats plush
Here is the part most lab owners get wrong. They buy comfort when they should be buying density, or they buy density when their dog is still in the shark phase and will eat it.
A lab does not curl up. He sprawls, legs everywhere, taking up more floor than you budgeted for. That is why donut beds are a joke for this breed. A 75 pound lab draped over a donut looks like a bear on a beanbag, and the foam underneath gives up fast.
Foam is measured in pounds per cubic foot. The dense stuff is roughly 3 to 4. The cheap stuff is 1.5 to 2, and it flattens into a pancake in a few months. That is the whole difference between a bed you keep for years and a bed you replace every season.
So the rule splits by age. Under three years old, your lab is still a chewer by definition, and you should buy cheap and expect destruction. Past three, and especially for a senior with hip trouble, the money goes into the foam and the cover.
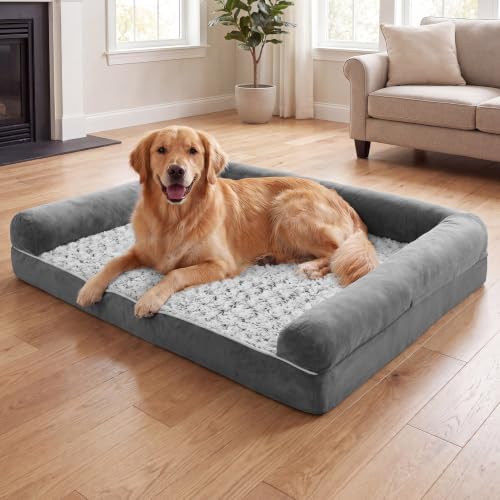
Senior sleep pick: Waterproof Short Plush Orthopedic Sofa Dog Bed for Large Dogs
 Visit on Amazon →
This is a sofa style bed in the large size range, with a waterproof cover, a short plush surface, and orthopedic foam under it. For a dog like Penny, who leans into an edge when she stands up and needs something that does not collapse under her rear end, the sofa shape does real work. The bolsters give her something to brace against, and the waterproof cover means a senior dog who has an occasional bad night does not turn the foam into a science project. Check current Amazon price.
Before you order, do three things. Measure your lab nose to tail and add 12 inches, because "large" in a title is a marketing word and not a measurement. Confirm the foam is genuinely orthopedic and not just a soft poly fill with a good adjective attached, and if the listing does not give a density, ask the seller before you buy. And check that the cover comes off and washes, because a waterproof surface still collects hair, drool, and whatever your lab rolled in.
Flaws but not dealbreakers: Short plush and a determined chewer are a bad combination. This is not a bed for a lab under three, and I would not put it in a crate with a puppy. It is a bed for a dog who has outgrown eating his furniture.
How to set up the crate and sleeping area, step by step
Step one: measure the dog and the crate. For the bed, nose to tail plus 12 inches. For the crate, your lab needs to stand up and turn around without ducking, which for a full grown lab usually lands in the 36 to 42 inch crate range. A puppy goes in the same crate with a divider so he is not given a bedroom when he needs a den.
Step two: pick the spot. Draft free, out of direct heat, and in a room where the family actually spends time. A lab in a back bedroom alone is a lab who learns to bark at the crate.
Step three: build the floor layer first. Lay the thin waterproof liner down so it extends a few inches past the crate on every side. On a hard floor, make sure the backing is the non-slip kind. On carpet, this layer is what saves you from a rug cleaning bill.
Step four: set the crate base correctly. Pan in the crate, liner underneath and around it. No thick bedding for a puppy. A thin, flat mat only. Anything thick and loose gets pulled out and shredded, and then you are vacuuming foam out of a crate for a week.
Step five: place the bed for the dog who is out of the crate. One bed, one dog, in a spot with a wall or a piece of furniture on one side if you can manage it. Labs sleep better with their back against something.
Step six: build a wash routine. Covers and liners get washed on a schedule, not when they smell. Weekly for a puppy in training. Waterproof backings do not belong in a hot dryer, and zippers are the first thing to fail, so zip them closed before the wash and open them after.
Step seven: inspect every week. Run your hands along the seams and check for pulled foam. The first sign a bed is dying is not a hole in the middle. It is a seam that has started to give at the corner where your lab launches himself onto it.
Step eight: redirect the chewing, every time. A puppy chews because chewing is what puppies do. Your job is to make the bed boring and the chew toy interesting, which means no games on the bed, no treats hidden in it, and a frozen chew toy offered the moment he starts working on a corner. No training fixes a two year old lab's jaw, which is why the durable setup matters in the first place.
The competition and why it lost
The beds I left out of this guide are the ones that keep showing up in lab homes and keep failing.
Donut beds, for the sprawl reason above. Thick plush crate pads sold to puppy owners, which are eaten, not slept on. Anything with "indestructible" printed on the box, because I have seen the lasted-a-week reviews and I have lived them. And the flat, cheap foam "orthopedic" beds, where the word orthopedic is doing all the work and the foam is doing none.
None of those are bad products in the abstract. They are just the wrong tool for a heavy breed with a jaw and a set of hips.
What this all costs
Here is the arithmetic that matters. A $60 bed that dies in four months costs more than a $300 bed that lasts three years. That is not an opinion, it is division. The $60 mistake is tuition, and the smart owners only pay it once.
The sweet spot for a lab is somewhere in the $150 to $250 range for a bed you intend to keep. Below $100 you are effectively renting a bed for a few months. Above that, you are paying for foam density, cover quality, and a warranty that does not require a notarized confession from your dog.
The floor layer is the cheapest insurance in the whole setup, and it protects a floor repair that costs many times more than the liner ever will. Check current Amazon price on both items before you commit, because that is the only number that changes.
Two jobs. Protect the floor while your lab learns, then put real foam under him once he stops eating his furniture. Get those right and you will not be writing your own tuition check next spring.